32-bit floating-point and other conversions
The 32-bit floating audio format seems to offer exceptionally high dynamic range and ease of use. However, there are limits! This article explores high-bit resolution microphone recording and addresses its limitations.

There are various professional and semi-professional recorders and converters that use the 32-bit floating-point (file) format. These solutions often imply that you don’t have to worry about gain setting anymore. This is only partially correct – there are limits to the maximum analog levels you can input.
Conclusion: The microphone decides the primary sound quality. High-range digital conversion (such as the so-called 32-bit floating-point format) lets you record above 0 dBFS (but not with 32-bit resolution). Also, ensure that the maximum input allowed is above the maximum output of your microphone. If not, consider changing the recorder – or the microphone.
It has always been a challenge to maximize the quality of each link in the audio chain during recording. In the digital domain, high resolution is achieved by allocating more bits per sample and using a higher sampling rate. However, a limited bit budget can come into play since high resolution also requires more storage space.
Another issue is the gain setting of the analog input. Previously, this was the most critical setting for any audio device, such as preamps, converters, recorders, mixers or wireless transmitters. Today, you might think it doesn’t matter when working with 32-bit floating-point converters at the input. At least, that is what you are told.
Today, when working with 32-bit floating-point converters at the input, we are told that it doesn’t matter anymore. Yet that is not entirely true.
What makes 32-bit floating-point audio different?
Typically, in fixed-point conversion, the number of bits per sample determines the theoretical dynamic range, approximately 6 dB per bit based on the resolution available:
|
# of bits |
Principle |
Resolution (steps) |
Dynamic range |
|
8-bit |
fixed point |
2^8 = 256 |
8 * 6 = 48 dB |
|
16-bit |
fixed point |
2^16 = 65,536 |
16 * 6 = 96 dB |
|
24-bit |
fixed point |
2^24 = 16,777,216 |
24 * 6 = 144 dB |
|
32-bit |
fixed point |
2^32 = 4,294,967,296 |
32 * 6 = 192 dB |
In real life, achieving a complete 32-bit resolution with true 32-bit conversion is impossible, due to component tolerances, thermal conditions and other factors. A resolution above 20-22 bits may exhibit some side effects, such as reduced linearity and noise modulation, regardless of the number of bits applied per sample. Even using a 64-bit conversion, the quality of the audio would be the same – but twice the bits were used in your workflow!
In addition, 192 dB dynamic range, even in the context of acoustic sound is not necessary. Keep in mind that the maximum dynamic range in air is from the hearing threshold (0 dB SPL) up to the point where air distortion occurs, as the negative part of the sound wave reaches the absolute vacuum, approximately 191 dB SPL, at its peak. However, the air has started distorting the sound long before, because the speed of sound is different in both the negative and positive part at extreme SPLs.
And, regarding microphones, the dynamic range is almost always below 130 dB.
With a floating-point solution, the dynamic range in theory can reach 1528 dB — a ridiculously high number which is of course not possible. 32-bit floating-point audio is more of a principle than a reality!
The reason for introducing the concept is to enable scaling of the audio. Developing overlapping conversions that may allow recording across a wider dynamic range than one fixed-point can offer, with significantly less risk of distortion at both ends of the dynamic range.
The 32-bit floating-point format uses 32 bits per sample. However, the bits are arranged differently from linear formats (see fact box 1). The configuration follows the IEEE 754 standard. Here, 23 bits are the significant ones that describe the signal, and 8 bits provide an exponent to indicate the scaling factor of the sample. The last bit is a sign bit that indicates whether the waveform at the time of sampling is positive or negative.
Real life “32-bit floating-point” solutions
In practice, recorders that use the 32-bit floating-point file format do not actually employ a “free floating-point” converter. The file format allows the implementation of, for example, two converters working in parallel — one optimized for high levels and the other for low levels. Using the exponent to determine which converter to select ensures the best signal quality, free from distortion or noise masking. This method is often referred to as a multi-stage converter. Sound Devices patented a version of this.
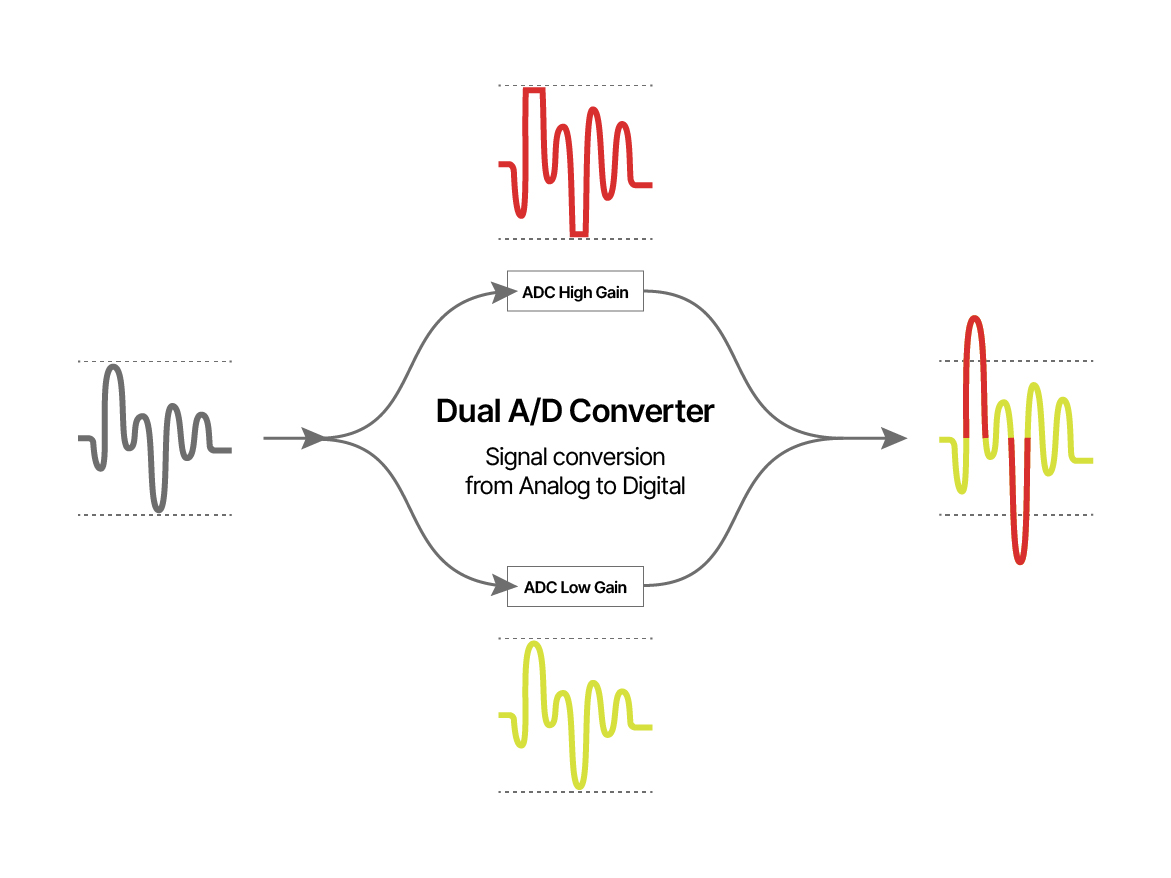
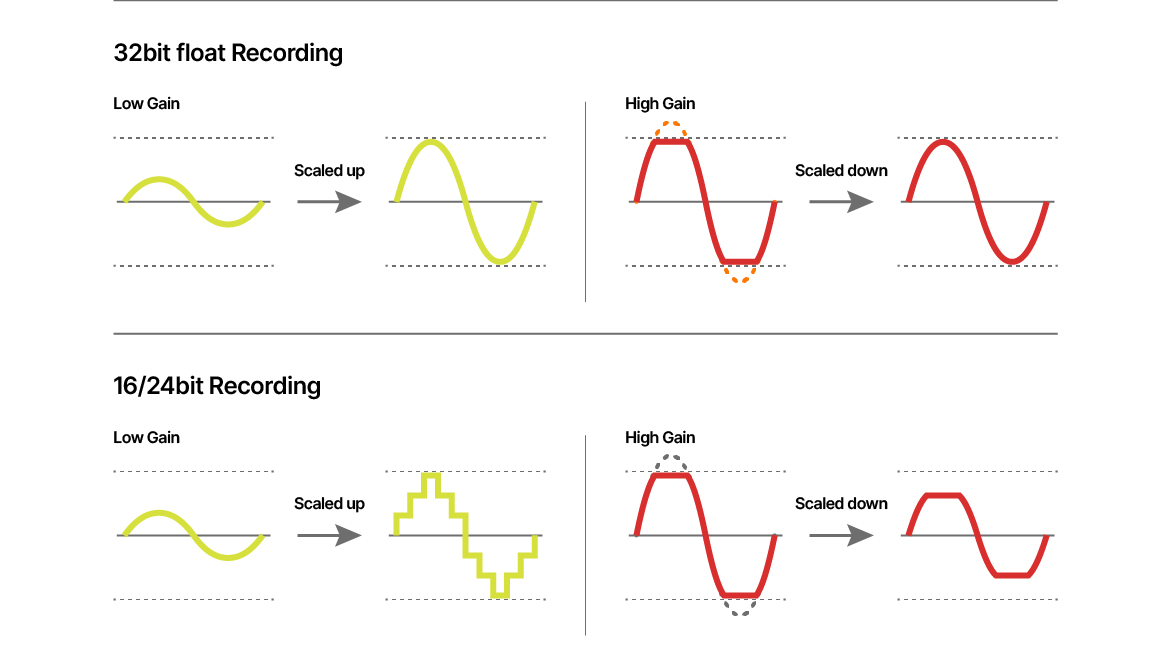
Illustration of principle of using 32-bit floating point (multistage) conversion. (Illustration idea by Tascam).
Stacked converters
To some degree, the coupling of more converters (stacking) is a technology that also applies to digital microphones (translating the diaphragm movement to a digital code). Further, it is a solution for digital wireless transmitters. (The DPA N-series Transmitters works in this way.) The art, then, is to find the right transition point between the two converters to avoid any kind of cross-over artefacts.
Input stage for (analog) microphones
Most microphones are analog, while most audio recording devices are digital. Therefore, focusing on the conversion process from analog to digital is essential, even though the microphone itself ultimately determines the overall dynamic range.
Analog microphones produce an output voltage based on 1: the microphone sensitivity and 2: the SPL at the pickup point. At the lower end of the dynamic range, it is the microphones’ self-noise that determines the minimum output. At the upper end, the limit is set by the microphone's output at the maximum SPL it can handle.
The goal for the input stage/converter is to deliver low noise and acceptable resolution at low levels, while ensuring distortion-free conversion at high levels just below clipping. (Remember, in linear digital systems, distortion is usually highest at low levels and lowest at high levels - until reaching the 0 dBFS clipping point).
The dynamic range of most 32-bit floating-point real-world converters is in the range of 130-142 dB.
Maximum input level
As mentioned, various professional and semi-professional recorders, converters and mixing consoles on the market use the 32-bit floating-point (file) format. Often, these solutions indicate that users don't need to worry about gain settings; however, there is a limit to the maximum analog level that can be applied to the input.
In the specs, look up data such as “input levels” and “maximum input level” for microphone inputs. Sometimes, no data is published, and you’ll have to verify it yourself (see fact box 2).
If the microphone output exceeds these levels, the audio will be clipped. Here are some examples of maximum accepted input in various commercial devices:
|
Brand/Model |
Max input |
|
Tascam DR-07XP2, 2-channel 32-bit Float Handheld Recorder: |
-4 dBu (0.63 volt) |
|
Tascam FR-AV2, Professional 2-channel Field Recorder |
+4 dBu (1.23 volt) |
|
Zoom F3, Field Recorder |
+4 dBu (1.23 volt) |
|
Zoom UAC 232 (Interface) |
+6 dBu (1.55 volt) |
|
Sound Devices MixPre-2/3/10 II |
+14 dBu (3.88 volt) |
|
Stagetec XMIC+ 32-bit Fixed Point Converter |
+24 dBu (12.28 volt) |
As shown in the table, all systems have limitations, but to quite different degrees. The Stagetec XMIC+ offers a dynamic range of 158 dB (not 196 dB as one might assume). However, the maximum input it accepts is far beyond what any standard microphone can produce.
DPA microphones and 32-bit floating input
In the diagram below, relevant DPA microphones are presented by their maximum output levels, defined at 1% THD (green bar) and 10% THD (red bar), respectively.
Also, in the diagram, find the maximum accepted input of the devices mentioned above (dashed vertical lines, devices A, B, C, D, and E). Unit: dBu (0 dBu = 0.775 V).
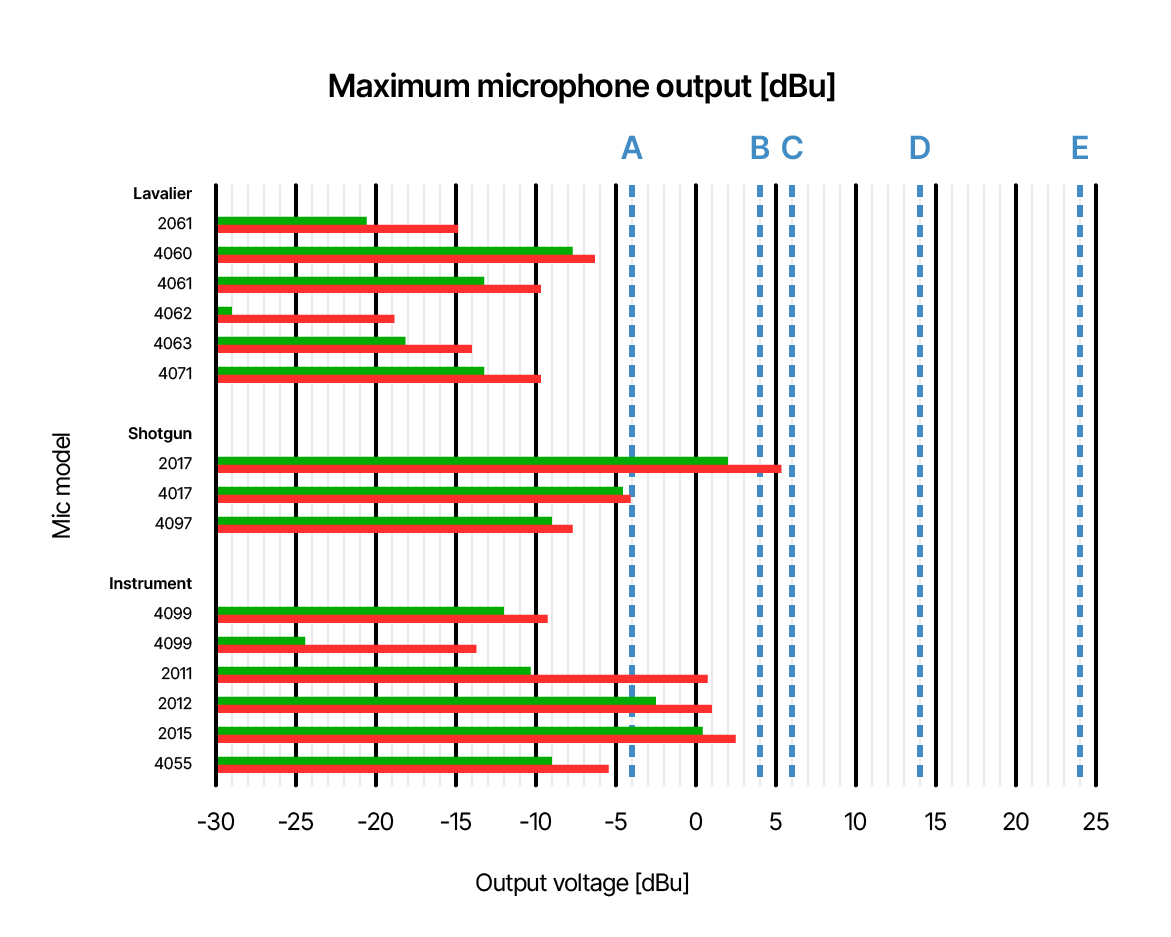
In this diagram, the green and red bars show the maximum output of microphones. The maximum is defined at 1% THD (green bars) and 10% THD (red bars), respectively.
The vertical lines indicate the maximum permitted level at the microphone input of a selection of devices.
- A: Tascam DR-07XP2.
- B: Zoom F3, Tascam FR-AV2.
- C: Zoom UAC 232.
- D: Sound Devices MixPre-3.
- E: Stagetec XMIC+
Notice that, for instance, the 2017 Shotgun Microphone can deliver extremely high levels. It is not advisable to combine this microphone with an A-type recorder. The same advice goes for DPA 2012 and DPA 2015.
Where is 0 dBFS?
Input sensitivity is another important measure. Which analog level corresponds to 0 dBFS? It might be considered redundant bonus information if you don’t need to worry about your input settings. Data is rarely published. However, it indicates the device’s setting of the level. It’s a specification that can be measured. (See fact box 3).
Here is an example:
|
Brand/model |
Analog level for 0 dBFS |
|
Zoom F3, Field recorder |
-26 dBu (39 mV) |
Handling the file
32-bit floating-point audio can be stored in a WAV file format. The file header includes a bit that indicates whether the format is fixed-point or follows the IEEE 754 floating-point audio (single precision) file format.
Each sample is represented by 32 bits. This means the device has already determined which stages/conversions to include in the file. It is not possible to select from different sample levels.
Importing the file into a DAW might show a clipped file if recorded above 0 dBFS (it's just the display that is limited). However, to get undistorted fixed-point audio, normalization is needed, which is a standard process in most DAWs.
Once normalized and stored in a fixed-point format, the floating-point representation is lost, and normalization cannot be undone. As always, make sure not to overwrite the original recording files. You might need to review this material later.
Example: 32-bit floating-point WAV file opened in Audition. Five 1 kHz sine wave bursts were recorded on the Zoom F3 microphone input. Levels recorded: 1, 1.1, 1.2, 1.3 and 1.4 volts, respectively.
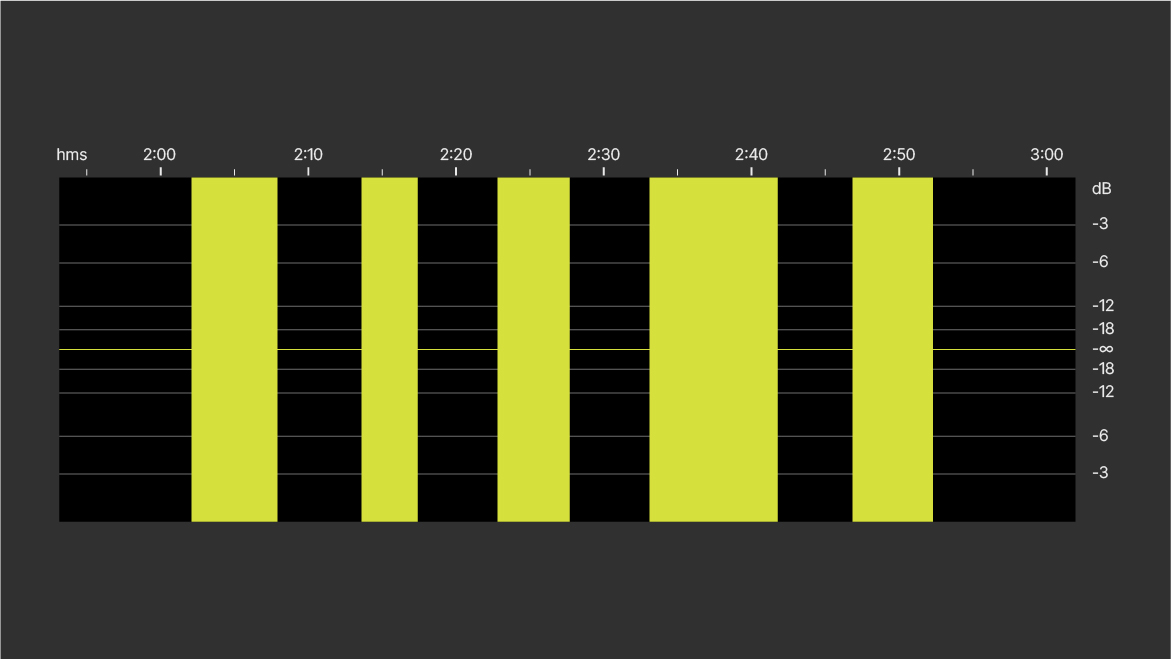
A: 32-bit floating-point WAV file opened in waveform view. The waveform exceeds 0 dBFS. (Usually, the scaling of the waveform view is max 0 dBFS by default).
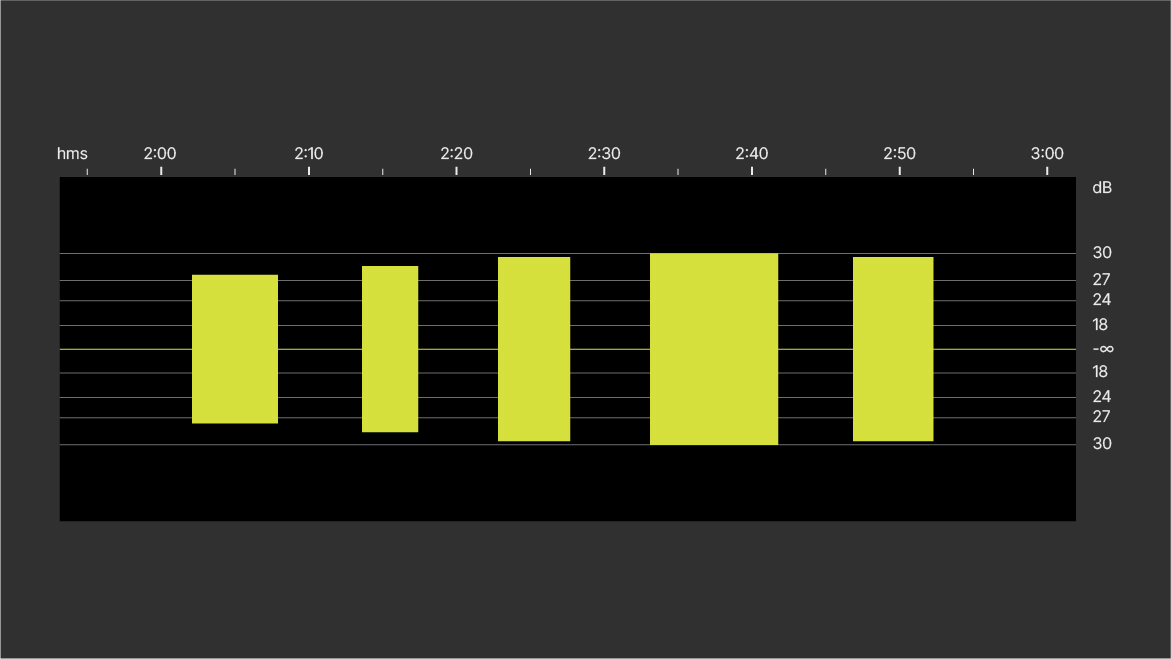
B: Waveform view with amplitude scale expanded.
The recorded maximum reads approximately +30 dBFS.
Now, there is a small level increment from the first tone burst to the fourth. However, there is no level increment from the fourth to the fifth (due to clipping).
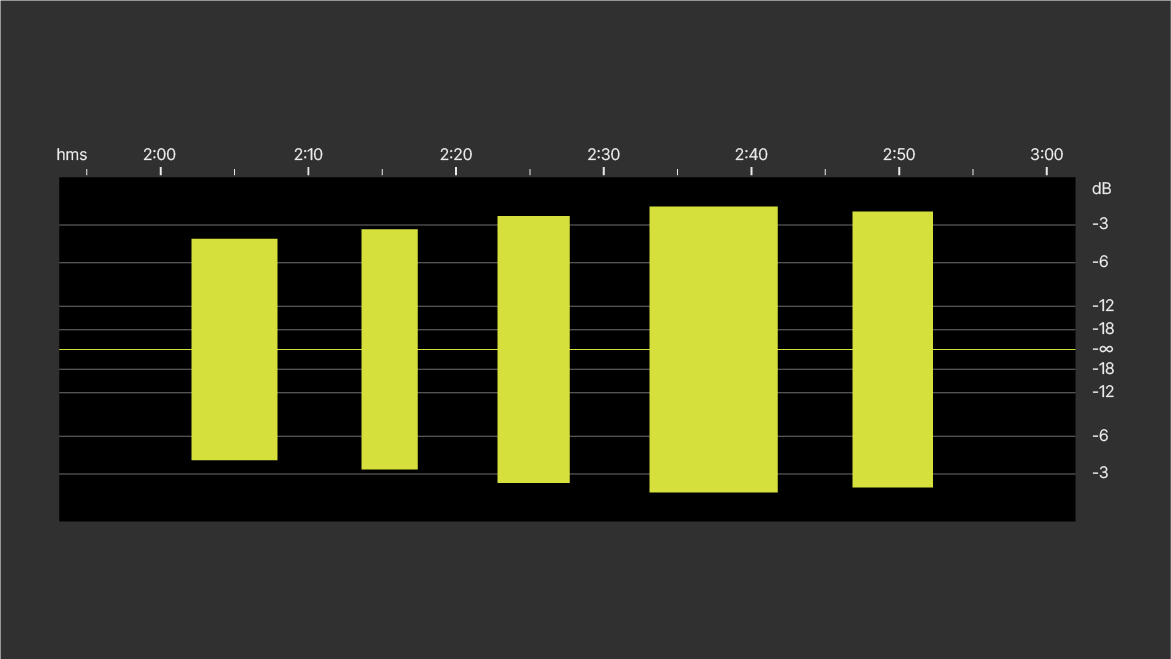
C: Waveform normalized to -1 dBFS.
Calibration
If you plan to record at an absolute level or multiple channels simultaneously, such as for immersive audio, it's best to record a calibration signal with a known level (below 0 dBFS) on each track (same level on all tracks). This ensures that the recorded calibration stays accessible regardless of normalization gain adjustments. Normalization may differ across channels if they are not linked.
You can use an acoustic calibrator (usually 94 dB SPL at 1000 Hz) if it has fittings to match the microphone.
If it is not possible to use an acoustic calibrator, you can use a tone generator if the microphones have identical sensitivity. The most practical option is a small sine wave generator with a fixed frequency and fixed electrical level, roughly the size of an XLR connector. Various versions are available on the market. Typically, these are small devices either powered by a battery or by the microphone input’s phantom power.
Conclusion
Using a 32-bit floating-point conversion for microphone input can be a practical choice if you don’t mind using 32-bit files in your workflow. Most of the time, it allows the microphones to perform at their best, but it can't improve their inherent quality. In practice, the major limitation of the input is the maximum analog level before clipping occurs. Below that point, the limits are usually set by the microphone itself, such as the maximum output level and self-noise.
The file format applies to several floating-point strategies. However, when first formatted into an IEEE 754-compliant wave file, all files behave the same way.
To get the best recording, all the good old rules still apply: Don’t be sloppy with your work. Ensure your input can handle all the mic juice!
References/readings
Tascam Europe: What is 32-bit floating resolution?
Tascam Europe | Audio Recording Devices for Professionals and Hobbyists
Sound Devices, 32-bit Float Files Explained
32-Bit Float Files Explained - Sound Devices
Stagetec XMIC+, specifications.
Wikipedia: IEEE 754
Floating-point Binary Numbers | OCR A Level Computer Science
- - - - - - - - - - - - - - - - - - - -
Fact Box 1
Floating-point audio file format (IEEE 754)
The IEEE organization (Institute of Electrical and Electronics Engineers) has created a standard for the 32-bit floating-point file format. Each sample is broken up into three blocks:
Bit 1: A sign bit that indicates whether the waveform sample is positive (0) or negative (1).
Bit 2-9: 8 bits. The exponent (excess 127 notation, biased value).
Bit 10-32: 23 bits. Mantissa (audio data).
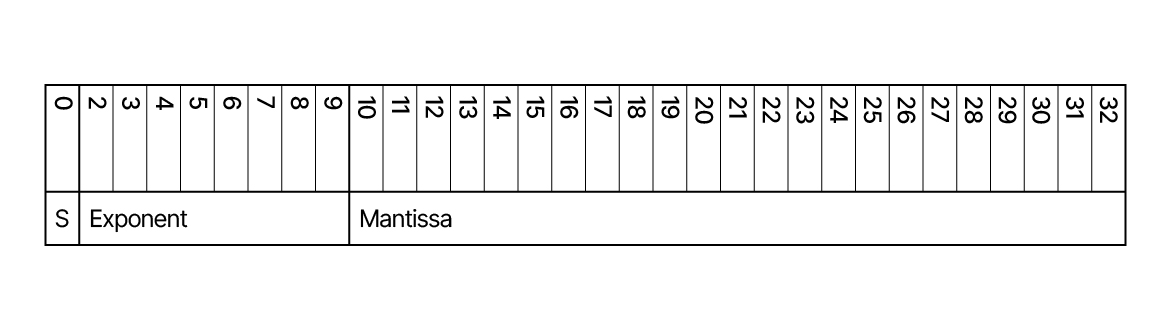
The exponent
The exponent consists of 8 bits. This provides binary numbers from 00000000 to 11111111. In decimal numbers, 0 to 255.
By applying “excess 127 form” negative exponents range from 0 to 126, and positive exponents range from 128 to 255. The missing exponent, 127, is the one right in the middle and represents a power of zero.
- - - - -
Fact box 2
How to find the max input level
Use a tone generator that can produce a sinusoidal waveform. Record a single frequency (for instance 1 kHz) and note the voltage. Start around 0.5 volts and increase the levels in steps of 0.1 volt.
Import the recording into your DAW and normalize. Check whether the level increment is visible.
If so, start at a higher level and repeat the procedure.
When no increments show up in the waveform, you have reached the maximum input level.
- - - - -
Fact box 3
How to find 0 dBFS
Use a tone generator to supply a known analog signal i.e., 1 kHz sine wave, 10 mV.
Make a recording of it.
Look at the wave file in your DAW (without normalizing) and read the dBFS level. The level should read a negative number (for instance -14 dB).
Calculate how many dB there are between this number and 0. For instance, in this example, from -14 dB to 0 dB = 14 dB.
Multiply the generator level (10 mV) by the factor, calculated from the dB (in this example 14 dB).
Factor: 10^([dB number]/20),
in this example, the factor is 10^(14/20) = 5.012
In this example, 0 dBFS corresponds to 10 mV * 5.012 = 50.12 mV.
- - - - - - - - - - - - - - - - - - - -